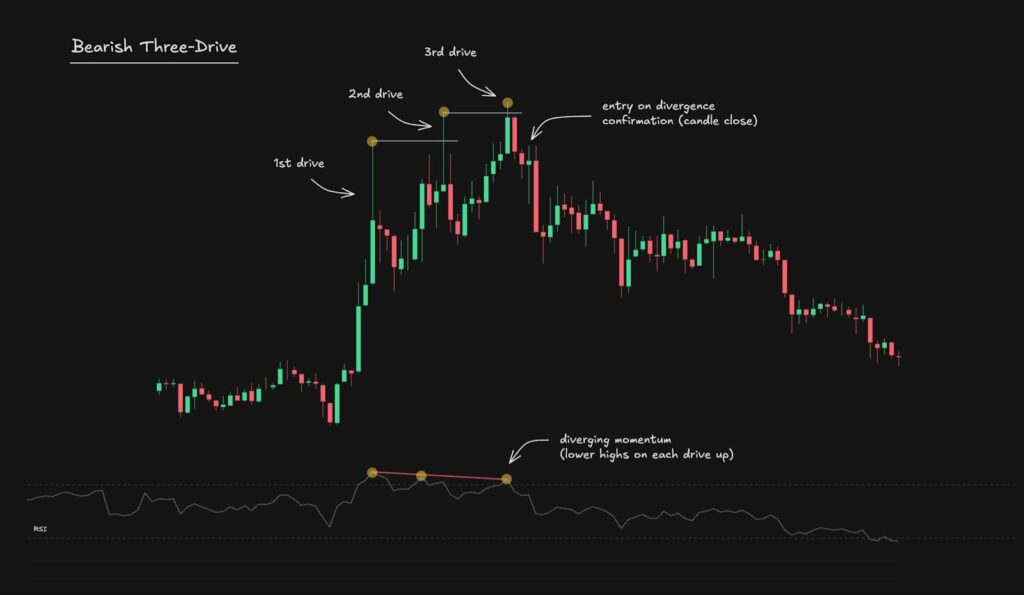
Sometimes a market doesn’t top in one clean blow-off candle. Instead, it climbs in three pushing waves, each one looking bullish on the surface, while the “engine” underneath is quietly dying. That’s the idea behind the bearish three-drive is clear: price makes three attempts to go higher, but momentum (often RSI) makes lower highs each time. The third push is often the last stretch of energy before sellers take control.
This guide explains what it is, why it matters, and how traders typically use it in real charts.
What the pattern is
A bearish three-drive is a topping structure with:
- Drive 1: Price pushes up strongly and prints a new swing high.
- Drive 2: Price pulls back, then pushes up again and makes another high.
- Drive 3: Price pulls back again, then makes a third push into a new high (or near-high) and starts failing.
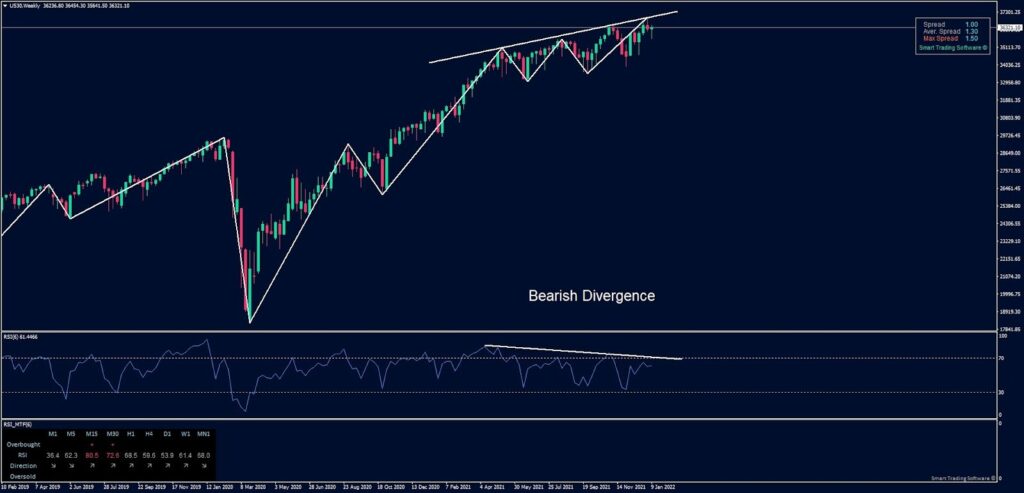
The pattern becomes meaningful when momentum shows bearish divergence:
- Price: Higher highs across the three drives
- RSI: Lower highs across the same three drives
That mismatch is the message. Price is still rising, but each new push has less real strength behind it.
Why it works: the market is “running out of fuel”
Drive patterns are mostly about positioning and psychology.
- First drive: Buyers are confident. Breakouts work. Shorts cover.
- Second drive: The market still climbs, but it needs more effort. Selling begins to appear into strength.
- Third drive: Late buyers show up (FOMO, “one more breakout”), but the market can’t accelerate anymore. When that third push fails, the unwind can be sharp because the final wave of longs is trapped near the top.
Bearish divergence on RSI supports this story: momentum peaks lower even as price peaks higher, suggesting buying pressure is fading.
How to identify a real three-drive (not just three random highs)
A common mistake is labeling any three swing highs as “three drives.” A cleaner three-drive has:
- Clear push, clear pullback, repeated three times
- Each pullback is meaningful enough that RSI has time to reset
- The third push reaches an obvious “sell zone” (prior high, range top, major resistance)
If price is just chopping sideways and printing tiny higher highs, the pattern is weaker. This setup is best when the chart shows a real climb into a ceiling.
The confirmation that matters most
Bearish divergence is a warning, not an entry by itself. The setup becomes tradable when price fails to follow through on Drive 3.
Typical confirmation signs include:
- A strong bearish candle after the third high (engulfing, long red close, or obvious rejection)
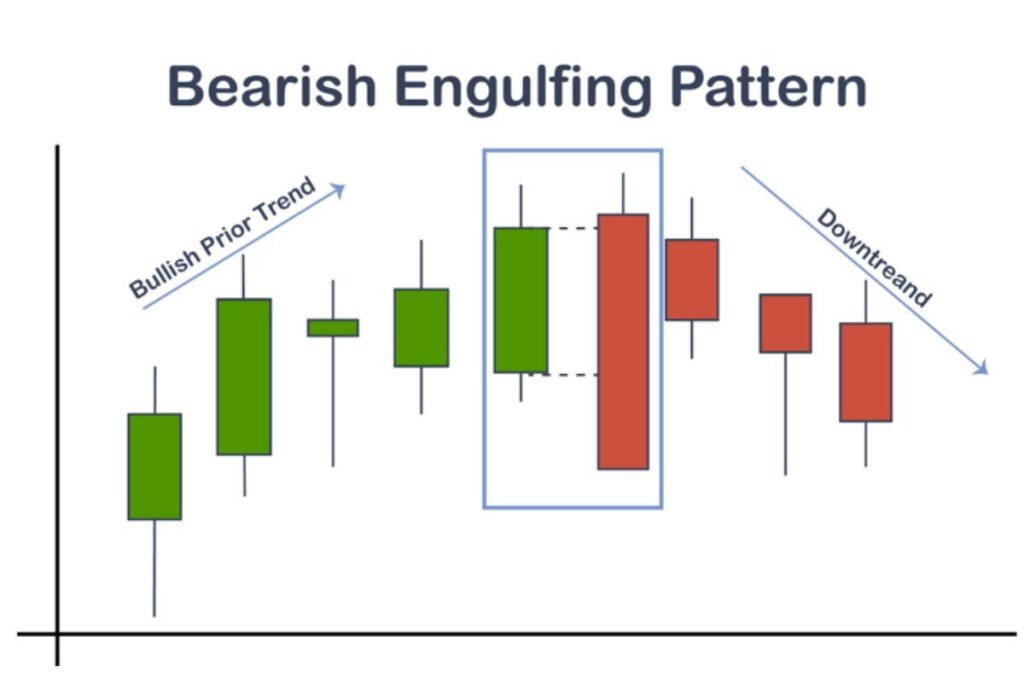
- A wick above the highs followed by a close back below the breakout area
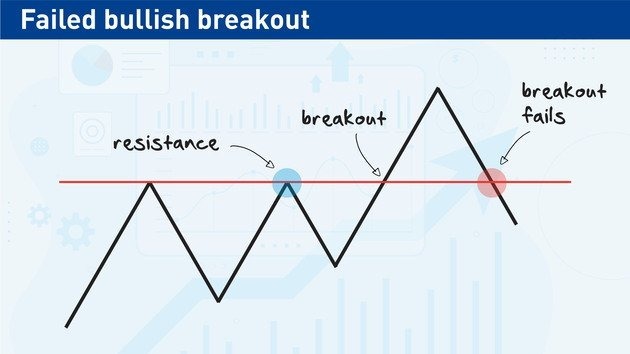
- A break of the most recent higher low (structure starts shifting)
Don’t short just because you see divergence, wait for the market to prove it’s actually turning.
Three common ways traders enter
1) Conservative entry (cleanest):
Enter after a bearish confirmation candle closes following Drive 3. This reduces fake-outs.
2) Structure entry (very reliable):
Wait until price breaks the last higher low formed during Drive 3, then enter on a retest. This is basically “trend flip confirmation.”
3) Aggressive entry (highest risk, best price):
Enter on the first strong rejection at the third high (especially if it sweeps above resistance and snaps back). This can give great risk/reward, but it fails more often if the trend is still strong.
Stops and targets (how people usually manage it)
Stop placement:
The standard stop is above the Drive 3 high (or above the sweep wick if Drive 3 includes a liquidity spike). If price accepts above Drive 3 and holds, the pattern is probably invalid.
Targets:
Many traders scale out into obvious support zones:
- Target 1: The base of Drive 3 (first demand area)
- Target 2: The base of Drive 2 (bigger structural support)
- Runner: If the top is major, price may unwind toward the start of Drive 1
This matters because three-drives can trigger anything from a small pullback to a full trend reversal. Scaling out keeps you paid even if it only corrects.
Where you’ll see it a lot (real-world examples)
- Range top: Price hits the top of a multi-week range three times, RSI weakens, then it rolls over.
- Post-news pump: First push is the headline reaction, second is follow-through, third is late retail chasing, then the reversal starts.
- “Sweep and fail” at a prior high: Drive 3 runs above a previous top, but closes back below it. This is one of the clearest versions in crypto.
When it fails
The most common failure is simple: price consolidates near the highs, RSI resets during the sideways chop, then the market breaks out again with fresh momentum. That’s why experienced traders care more about price structure breaking than divergence alone.
The takeaway
A bearish three-drive is best thought of as an exhaustion map: three pushes up, weakening momentum, and then a visible failure at the top. When it appears into a major resistance zone, it can be one of the cleaner topping patterns in trading, especially in crypto, where “one last squeeze” is a regular event.
This article is not financial advice. Please do your own research (DYOR). You can also DYOR on blog.millionero.com and when ready, trade spot and perps on Millionero.